
CellChek®
Frequently Asked Questions &
Specifications
Frequently Asked Questions

On request, KonanCare assistance enables eye care practitioners to consult, by appointment, with Konan’s on-staff experts for interpretation of specular microscopic images, and to receive assistance on more advanced topics and methods associated with Konan’s products. With all current product models, a web-base, by permission only login session can be initiated allowing both the physician and the KonanCare team member to simultaneously view and discuss actual images using secure internet web services.
KonanCare assistance is provided without charge for customers during the initial warranty period or during any period of Service Agreement coverage. A unique service, only from Konan Medical.
We set the bar on clinical excellence. Starting with the initial onsite installation and training, we also provide a primer as detailed training videos installed directly on the instrument. Further, a 4 page “Quick Tips” and a detailed reference guide called “The Konan Cell Book” provide expert reference materials. Once you have used the instrument for at least 2 weeks to gain experience with both normal and unusual patients, we encourage you to schedule advanced remote training and clinical support with our in-house clinical support team. Lastly, your KonanCare support provides on-request periodic help with our permission-based, remote access tools.
Yes. Please contact the support team to ask about upgrading your current CellChek software.
Yes! Additionally a DICOM solution is available – please contact the support team for more information.
Not critical at all. As long as the patient’s head is perpendicular to the instrument, the chin is on the chinrest, forehead is against the headrest and the patient’s cornea is in vicinity of center of the screen. The auto-align feature will automatically align the optics head to the eye’s visual axis and then auto-focus on to the endothelium.
Less than 20% of the eye banks do not use a device that can perform the Center Method of analysis and therefore may produce cell density assessments that are mathematically not equivalent.
Yes, you should be able to capture a patient wearing contact lenses. This however this is not considered best practice as the additional optical interfaces may degrade the quality of the specular image and the optical pachymetry values will include the thickness of the contact lens rending pachymetry not useful.
CellChek has the ability to capture 5 areas of the endothelial layer: 1 central and 4 peripheral. You can control the placement of the green fixation target using the crossbar located on the image acquisition screen. Always make sure the patient can see the green target and continues to look at it during the capture process.
This is caused by dry eye. If needed, provide artificial tears to the patient to ensure high quality images.
This can be caused by dust particles on the optic lenses reflecting the flash back into the camera. Use the provided dust blower to clean the lenses. Never touch the lenses with your hands.
This is typically caused by poor patient positioning. The camera tries to capture the flattest area of the cornea and if the patient’s head is tilted or turned slightly, the camera will capture some of the cornea’s curvature and create small shadows on the image. Ensure the patient’s forehead is pressed against the forehead bar, chin is moved all the way forward to the back of the chinrest, and their head is perpendicular to the forehead bar. Also, check if there is an environmental light source that is shining directly into the eye guard; in this case, try blocking the light from that side of the patient’s head with something like a clipboard or piece of paper.
CellChek comes with a very useful feature called IOL/ICL Mode. When a patient has an IOL/ICL, the flash may reflect off of the lenses and create black images. The implants may also prevent the optics from finding the endothelial layer. The optics uses the reflection from the tear layer to locate the endothelial layer. If it cannot determine which reflection is from the tear layer you may get a Failure to Record. Moving the IOL/ICL reflections off-center enables the optics to find the tear layer and endothelial layer more effectively. Never use IOL/ICL mode to initially position a patient. Always make sure they are properly positioned and centered within the capture window before moving the camera using IOL/ICL Mode. Combining manual photography with IOL/ICL mode may also help capture a very difficult endothelium.
If you are receiving Failure to Record when imaging a Patient with Cataracts, try capturing using manual photography. Cataracts can prevent the optics from finding the endothelial layer. In these instances, simply use manual photography and provide an approximate pachymetry value. This will tell the optics at what depth to take the image. If your approximate value is too deep and you capture part of the Aqueous, your image will show black on the left area of the image. Simply decrease the pachymetry value and re-capture. If your approximate value is too shallow, you may capture part of the Stroma, showing white on the right area of the image. Simply increase the pachymetry value and re-capture.
Manually specify the pachymetry value using the up/down arrows at the image acquisition screen. Click the pachymetry value to return to AUTO capture. Drop the last digit when specifying the pachymetry value using Manual Photography (for example, a pach value of 580 should be set to 58).
In many cases CellChek will automatically obtain a usable image, even with high pachymetry, however, if it in certain difficult cases manual photography may be required.
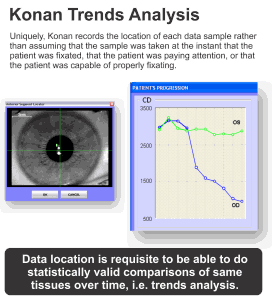 Konan Trends Analysis 101028Trend analysis is unique to Konan and utilizes a robust FDA cleared database to record the image, image location and the analysis. Recall the patient’s records in the database, highlight the records you which to compare and click the button marked “Patient History”. This will instantly display \the baseline analysis, and subsequent changes in cell count, cell shape and cell size.
This error may occur when attempting to open CellChek. Ensure that the USB Security Key is plugged into one of the computer’s USB ports. This key is required to run any Konan Analysis software.
This error may occur when the CellChek software is opened and during the specular microscope “check” phase. Ensure that the specular microscope is powered on and that both the serial cable connection and termination key are plugged into the back of the microscope.
CellChek uses a Microsoft Access database that can store up to 8000 records. If needed, CellChek can easily take advantage of multiple databases. You can create new databases and switch between databases under the tools menu.
This really depends on how often you capture patients. More frequent backups will ensure the latest data is not lost, should there be a need for disaster recovery. However, if patient’s are captured daily, backups performed at the end of the week are typically sufficient. The database can also be stored on a Network Location, such as a file server that is already included in a network-wide backup policy.
Please consult with you local IT staff or vendor to ensure you have implemented a robust disaster recovery plan.
Specifications
|
Type
|
Class I, Type B electrical equipment
|
|
Imaging method
|
Non-contact: auto-alignment, auto-focus, auto-capture, auto cell count
|
|
Imaging field
|
0.1 mm2
|
|
Measurement accuracy (corneal thickness)
|
+/-10 um or better
|
|
Analytical accuracy
|
Cell area (Center Method): +/-5%
|
|
Camera
|
Built-in CCD image sensing element camera
|
|
Flash
|
Konan Xe tube
|
|
Focusing illumination
|
Konan Halogen lamp
|
|
Input voltage
|
100-240VAC, 50/60 Hz
|
|
Fuse
|
3A (250V) x 2 (Fast Blow 5 x 20)
|
|
Power consumption
|
70 VA
|
|
Weight
|
20.5 Kg
|
|
Dimensions
|
~ 420(H) X 334(W) X 486(D) mm
|
|
Regulatory
|
FDA 510(k) Cleared | Health Canada Licensed |